![logo-3.png]](https://support.greencheckverified.com/hs-fs/hubfs/logo-3.png?height=29&name=logo-3.png)
Note: This feature is now available in your sandbox, with a general launch planned for mid-to-late November. Please use this article to get up-to-speed on Risk Assessments as you test in your sandbox.
Risk Assessments let you build scored, internal assessments that set an account's risk rating the moment you complete them. You build a template once, send it to your team from an account, and they complete it on a full page with a live score. The result lands as a dated, examiner-ready rating on the account, with a full history you can export.
⚡️ Quick start
- Build a template. Go to Settings › Templates › Risk Assessments › New template. Add sections and questions, set points on each answer and weights on questions and sections, then Publish.
- Set your rating bands. In your organization's risk settings, define the bands (for example Low, Low-Moderate, Moderate-High, High) that every assessment scores into.
- Send it. Open an account, use the Create Task button and Internal, choose Risk Assessment, and pick a published template, an assignee, and a due date.
- Complete it. The assignee opens the assessment from the account's Tasks tab, answers the questions, and watches the score rail show the running score and rating. Only users with override permission can change the computed rating, and only an override needs a justification.
- Track risk history. Find the current rating and full history on the account's Internal › Risk tab, and export it to PDF for examiners. You can also see a parent/child rollup.
Before you start
A few things to know before you build your first assessment.
- Who can do what. Admins, Account Owners, and those with the Template Editor role can create, edit, and publish templates. Anyone can be assigned an assessment and complete it. Only the Risk Rating Approver role (plus Admins and Account Owners) can override a computed rating.
- Only Radio and Select questions can be scored and weighted. Those are the fields you attach points to. Text, date, file, checkbox, and display fields can be used to capture context on the assessment but carry no score or weight.
- Every assessment normalizes to 0-100. No matter how many sections or questions a template has, the result is always a single 0-100 score, so one set of rating bands works across every template.
Build a risk assessment template
Build your templates once, then reuse them every time you assess an account. The builder works just like the questionnaire builder.
- Go to Settings › Templates › Risk Assessments › New template.
- On the Settings tab, set the name, description, and time to respond (the default due window when the assessment is sent).
- On the Questions tab, add your questions and group them into sections. You can add, reorder, and duplicate both. There is always at least one section.
- For each scored question, use a Radio or Select field and enter each option as a label plus points (for example Low = 1, Medium = 3, High = 5).
- Set a weight on each question (weights total 100% within a section) and a weight on each section (section weights total 100% across the template).
- Use Preview to see the template with live scoring, then Publish.
How scoring works
Green Check turns the answers on a risk assessment into a single 0 to 100 score, then maps that score to a risk rating. Because every assessment normalizes to the same 0 to 100 scale, one set of rating bands works across every template you build.
Scoring happens in two steps:
Step 1: Score each section (0 to 1)
Inside a section, each question contributes its answer points times its question weight. Green Check adds those up, then divides by the most the section could have scored (the top answer on every question, times its question weight). That puts the section score between 0 and 1.
Section score = (sum of: answer points × question weight) ÷ (sum of: max points × question weight)
Step 2: Combine the sections (0 to 100)
Each section score is multiplied by its section weight, and the sections are added together for the final 0 to 100 score. Question weights total 100% within a section, and section weights total 100% across the assessment.
Final score = sum of: (section score × section weight)
Worked example
Take one section, Business Operations, weighted at 15% of the assessment.
| Question | Answer (points) | Question weight |
|---|---|---|
| How long has the business operated? | 3 of 5 | 40% |
| Does the business have an ATM? | 1 of 5 | 25% |
| Current or prior banking relationship? | 1 of 5 | 35% |
- Weighted answers: (3 × 0.40) + (1 × 0.25) + (1 × 0.35) = 1.80
- Max possible: (5 × 0.40) + (5 × 0.25) + (5 × 0.35) = 5.00
- Section score: 1.80 ÷ 5.00 = 0.36
- Section contribution: 0.36 × 15% = 5.4 of 15 points
Every other section is scored the same way, and the section contributions add up to the final 0 to 100 score. That score falls into one of your rating bands (for example 0-25 Low, 26-50 Low-Moderate, 51-75 Moderate-High, 76-100 High).
Why weights have to total 100%
Green Check requires weights to add up to 100% at both the question and section level, and flags them if they don’t instead of adjusting them for you. Explicit weights that total 100 are what you document and defend in an exam.
For a reference doc with the full model and a sample template, see the Scoring & Weighting Cheat Sheet.
Validate and publish
- A live rail shows your section and question weight totals as you build, with clear balanced and unbalanced states.
- Publishing is blocked until weights are valid at both levels, and the reason is shown. Drafts auto-save in the meantime.
- Editing a published template writes to a draft copy. Publishing a new version never changes assessments that were already sent.
⚠️ Important: Both weight levels (the questions within a section and all sections within the assessment) must total exactly 100%. The user interface will guide you through ensuring that your weight levels add up to 100.
Set your rating bands
Because every assessment scores 0-100, your rating bands live at the organization level and apply across every template. You set them once.
- Contiguous and complete. Bands must cover 0 to 100 with no gaps or overlaps. The default is four bands at 25% each, and you control the number of bands, the cutoffs, and the labels.
- Example bands: Low (0-25), Low-Moderate (26-50), Moderate-High (51-75), High (76-100).
- Each band has a midpoint. The midpoint is used when a rating is set directly without a score, for example when a rating is set during account approval or inside a Monitoring Review with no matching assessment. It is also used to set any roll-up scores on the parent.
📋 Note: Editing your bands affects open assessments and parent roll-ups going forward. Completed results keep the bands they were finished under, so past ratings never change retroactively.
Send a risk assessment
Send an assessment from the account you want to assess. The ability to set up recurring risk assessments is coming very soon, as well.
- Open the account and select the Create Task button, then choose Internal > Risk Assessment.
- Pick a published template (unpublished drafts don't appear).
- Choose an assignee: yourself, another user, or a group.
- Set the due date.
- Add an optional note. It's included in the assignment notification email.
- Submit. The assessment appears as a task on the account's Tasks tab and in the org-wide Tasks area, with the assignee, due date, and status.
✅ Tip: You can have more than one open assessment on the same account at a time. All completed results will write to the risk history table.
Complete and submit
The assignee will receive an email and complete the assessment on a full page.
- Open the assigned assessment from the account's Tasks tab or the notification.
- Answer the questions section by section. Every field autosaves as you go, so you can leave and come back without losing answers.
- Watch the sticky score rail show the running score and the band it currently falls into.
- Once every question is answered, Green Check captures the computed final rating.
- If needed, override the computed rating and enter a justification, then confirm. There are times where the person completing the assessment knows information that wasn't captured, which is why the override exists.
✅ Tip: The rail uses your organization's current bands while the assessment is open, and the band version in effect is recorded with the result. Only users with override permission can change the rating, and a justification is required only on an override, not on a normal submission.
View a completed assessment and export it
Every completed assessment is a read-only result that anyone at your institution can open, even after the task closes.
- The result shows the final rating and the score it came from. Overridden results are labelled as manually overridden and show both the computed and final values.
- The justification opens in a drawer showing the rating, who set it, when, and the text, with a link to the completed assessment. Examiner and auditor roles can view it.
- Results are snapshotted. A completed result always renders against the bands it was finished under, not today's bands if they've changed since.
- Export to PDF in one click. The export includes points, question and section weights, the computed score, the band, the final rating, the override flag, and the justification.
Track risk history on the account
Every rating change is recorded on the account. Open Accounts › Internal › Risk to see it.
- The current rating shows at the top of the Risk sub-tab.
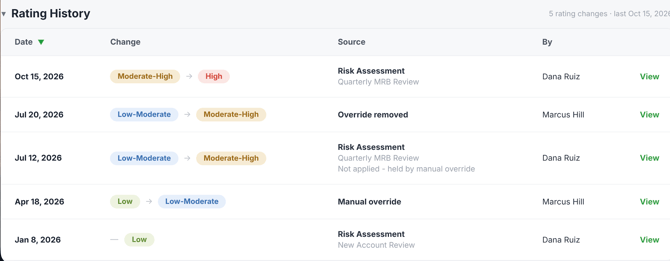
- The history table logs the rating, what changed, the date, who did it, and the source.
- Sources distinguish manual override, monitoring review, risk assessment, band change, and the seeded initial rating.
- Each row links to the justification or the completed result. Examiner and auditor roles can view the table, and it's exportable for examiners.
A rating history table example:
Parent accounts and roll-up
For parent/child org setups, a parent account's rating rolls up from its children automatically, unless if the parent account has its own assessment or an override. The risk rating history will show children ratings.
-
Automatic. The parent’s rating updates on its own whenever a child’s assessment changes.
-
Averages the children’s scores. The roll-up averages each child’s completed score, then maps that average to a band using the parent’s own bands. If a child’s rating was set by hand, its rating’s band value is used in the average. Children with no completed assessment are left out, not counted as zero.
- Partial is flagged. If the roll-up doesn't yet cover every child, it's clearly marked as partial so you know it's still filling in.
- The parent has its own history table, matching the child view, so roll-up changes are tracked and attributed too.
When more than one rating applies to a parent, this is the order of precedence:
Parent override › Parent's own assessment › Child roll-up
✅ Tip: You can override a parent's rating with a required justification, and the computed value stays visible alongside it. Remove the override (also with a justification) and the rating falls back to the parent's own assessment, or the roll-up if there isn't one.
Tips for your team
- Keep one FI-wide band set. Because every assessment scores 0-100, a single set of bands works everywhere.
- Use sections to mirror your methodology. Grouping questions into weighted sections makes the score easy to explain to an examiner.
- Add context-only fields for evidence. Text, file, and date fields don't score, but they're useful for notes, attachments, and research logs on the record.
- Export the Risk history PDF for exam prep. It's a dated, attributed record of every rating change, ready to hand over.
FAQ
What's the difference between a risk assessment and a questionnaire? A questionnaire collects information from your clients. A risk assessment is internal and scored, and completing it sets the account's risk rating automatically. They're separate tools for different audiences, but the risk assessment builder works just like the questionnaire builder.
Which question types are scored? Only Radio and Select (list) dropdown fields. You attach points to their options. Text, date, file, checkbox, and display fields capture context but carry no score or weight.
Do I have to use sections? Every template requires at least one section, but you can add all questions to the existing section on the page to get started.
When is a justification required? Only when someone manually overrides the computed rating. A normal submission doesn't need one, because the completed assessment is itself the record.
What happens to past results if I change my bands or template? Nothing. Completed results are snapshotted and render against the bands they were finished under. Editing a published template never changes assessments already sent and will apply to only future sends.
Can I set assessments to run on a schedule, or launch them from a Monitoring Review? Not in this release. Recurring assessments and kicking one off from inside a Monitoring Review are on the roadmap. For now, send each assessment from the Create Task button in the account.
How is a parent account's rating calculated? It's the average of its children's completed ratings, with unrated children excluded. A parent's own assessment or a manual override takes precedence over the roll-up. The order of precedence is: Parent override › Parent's own assessment › Child roll-up calculation